Hono 🔥 WakuWaku AWS deploy
https://zenn.dev/jp/articles/6a5f2d90d0c6c8
↑日本後版
First, we'll construct an AWS Amplify setup using Hono with a React minimum framework called Waku. Waku acts as a middleware for Hono, emulating advanced React Server Side features like Next.js. We'll also cover accessing VPC resources through Hono with AWS Amplify.
AWS Amplify supports deploying server applications other than Next.js by AWS Amplify Hosting Deployment Specifications for server apps. Amplify automatically detects and configures Next.js or Nuxt.js. But other server frameworks require reconfiguring according to Amplify’s deployment specs post-build.

https://docs.amplify.aws/nextjs/start/quickstart/nextjs-app-router-client-components/
1. Deploying Waku with Hono on AWS Amplify
Start your project using npm create waku@latest,
merge these three files into your repo’s root dir,
and deploy through AWS Amplify Console.
AWS Amplify probably utilizes aws-lambda-web-adapter’s sidecar on the lambda side
to bridge the gap between the http object and lambda's event object,
making it possible to deploy Hono on AWS Lambda with a simple node startserver.mjs.
1.1. Create startServer.mjs
This code launch a server in AWS Amplify’s AWS Lambda@Edge env using node startServer.mjs command.
It registers dist/entries.js code files built by Waku as Hono middleware.
// startServer.mjs
import { Hono } from "hono";
import { compress } from "hono/compress";
import { serve } from "@hono/node-server";
import { serveStatic } from "@hono/node-server/serve-static";
import { serverEngine } from "waku/unstable_hono";

const app = new Hono();

app.use(compress());

app.use(serveStatic({ root: "./public" }));

app.use(
  serverEngine({
    cmd: "start",
    loadEntries: () => import("./entries.js"),
    env: process.env,
  })
);

app.notFound((c) => c.text("404 Not Found", 404));

console.log(`ready: Listening on http://localhost:3000/`);

serve({ ...app, port: 3000 });
1.2. Create amplify.yml
Adjust build file dir structures and specify commands in AWS Amplify’s CI/CD to run any server app.
Commands to move Waku's build files to .amplify-hosting/compute/default are included.
version: 1
frontend:
  phases:
    preBuild:
      commands:
        - npm ci --cache .npm --prefer-offline
        - npx ampx pipeline-deploy --branch $AWS_BRANCH --app-id $AWS_APP_ID
    build:
      commands:
        - npm run build
    postBuild:
      commands:
        - npm prune --production
        - rm -rf ./.amplify-hosting
        - mkdir -p ./.amplify-hosting/compute
        - cp -r ./dist ./.amplify-hosting/compute/default
        - cp -r ./node_modules ./.amplify-hosting/compute/default/node_modules
        - cp -r ./dist/public ./.amplify-hosting/static
        - cp -r ./dist/public ./.amplify-hosting/compute/default
        - cp deploy-manifest.json ./.amplify-hosting/deploy-manifest.json
        - cp startServer.mjs ./.amplify-hosting/compute/default/startServer.mjs
        - 'echo "{ \"type\": \"module\" }" > ./.amplify-hosting/compute/default/package.json'
  artifacts:
    baseDirectory: .amplify-hosting
    files:
      - '**/*'
1.3. Create deploy-manifest.json
Define an AWS Amplify stack to configure .amplify-hosting/compute/default for server-side operation.
It only changes computeResources entrypoint to allow startServer.mjs to run by node.
(The other follows the official tutorial.)
{
  "version": 1,
  "framework": { "name": "waku", "version": "0.21.7" },
  "imageSettings": {},
  "routes": [
    {
      "path": "/_amplify/image",
      "target": {
        "kind": "ImageOptimization",
        "cacheControl": "public, max-age=3600, immutable"
      }
    },
    {
      "path": "/*.*",
      "target": {
        "kind": "Static",
        "cacheControl": "public, max-age=2"
      },
      "fallback": {
        "kind": "Compute",
        "src": "default"
      }
    },
    {
      "path": "/*",
      "target": {
        "kind": "Compute",
        "src": "default"
      }
    }
  ],
  "computeResources": [
    {
      "name": "default",
      "runtime": "nodejs18.x",
      "entrypoint": "startServer.mjs"
    }
  ]
}
Push the configuration to GitHub, and simply connect your GitHub with AWS Amplify Hosting CI/CD to deploy any web framework like Waku or Hono.
2. Deploying Hono in AWS VPC using AWS CDK
AWS Amplify automates CloudFront, CloudWatch, Lambda and S3 construction via CI/CD. However, AWS Amplify currently lacks the ability to deploy AWS Lambda within a VPC or to apply detailed security settings such as IP address restrictions (#12) and WAF configurations (#36). (These features might be announced at mid-this month!#36) Following setup allows deploying a VPC Lambda by aws-cdk and AWS Amplify CI/CD, accessing RDS or other AWS stack resources inside the VPC.
https://github.com/aws-amplify/amplify-hosting/issues/794 https://aws.amazon.com/jp/blogs/mobile/accessing-resources-in-a-amazon-virtual-private-cloud-amazon-vpc-from-next-js-api-routes/
Using AWS Amplify Backend, you can instantly build and deploy configurations needed to startup service. This includes user AWS Cognito authentication and AWS DynamoDB serverless databases. Initialize the Amplify backend with the following command:
npm create amplify@latest
2.1. Define the Handler
Set up the AWS Lambda handler to return a simple "Hello Hono!" text. This is the foundation for future enhancements to access RDS or EFS within the VPC.
// amplify/handler.mjs
import { Hono } from "hono";
import { handle } from "hono/aws-lambda";

const app = new Hono();

app.get("/", (c) => c.text("Hello Hono!"));

export const handler = handle(app);
2.2. Custom Lambda in VPC
Define the AWS Lambda Custom Stack within the VPC using AWS CDK. This is based on Hono docs code to construct AWS Lambda.
// amplify/custom.ts
import * as cdk from "aws-cdk-lib";
import * as lambda from "aws-cdk-lib/aws-lambda";
import * as ec2 from "aws-cdk-lib/aws-ec2";
import { Construct } from "constructs";
import { NodejsFunction } from "aws-cdk-lib/aws-lambda-nodejs";

interface Props {
  vpc: ec2.Vpc;
}

export class VpcLambdaStack extends Construct {
  constructor(scope: Construct, id: string, props: Props) {
    super(scope, id);

    const { vpc } = props;

    const fn = new NodejsFunction(this, "VpcLambdaFunction", {
      entry: "amplify/handler.mjs",
      handler: "handler",
      runtime: lambda.Runtime.NODEJS_18_X,
      vpc,
    });

    new cdk.CfnOutput(this, "VpcLambdaFunctionArn", {
      value: fn.functionArn,
      exportName: "VpcLambdaFunctionArn",
    });
  }
}
2.3. Configure Backend
Set up the backend to integrate the VPC Lambda Stack, ensuring it's built and deployed via AWS Amplify's CI/CD. (Following code, The Cognito and Dynamodb deployment phases have been removed once.)
// amplify/backend.ts
import { defineBackend } from "@aws-amplify/backend";
import * as ec2 from "aws-cdk-lib/aws-ec2";
import { auth } from "./auth/resource";
import { data } from './data/resource';
+ import { VpcLambdaStack } from "./custom";

const backend = defineBackend({
-   auth,
-   data,
});

const stack = backend.createStack("CustomResources");

const vpc = new ec2.Vpc(stack, "CustomStackVPC");

new VpcLambdaStack(stack, "CustomStackLambda", { vpc });
Push these change to GitHub, and VPCLambda deployed through AWS Amplify CI/CD 🚀
3. Accessing VPC Lambda via AWS Amplify
To achieve Server-Side Rendering (SSR) using resources within a VPC, follow these steps to connect AWS Amplify with VPC-based Lambda functions:
3.1. Verify ARNs
First, note App ARN for both the AWS Amplify application and the VPC Lambda:
- AWS Amplify ARN: Found under
Amplify console > General settingsas App ARN. and memo the service role to be used late.

- VPC Lambda ARN: Located in the
CloudFormation > Stacks > {appname} > Outputs > valueas Amplify CustomResource deploy log. (There is a CustomResources like Amplify App ARN noted earlier!)

3.2. Attach IAM for Invoker
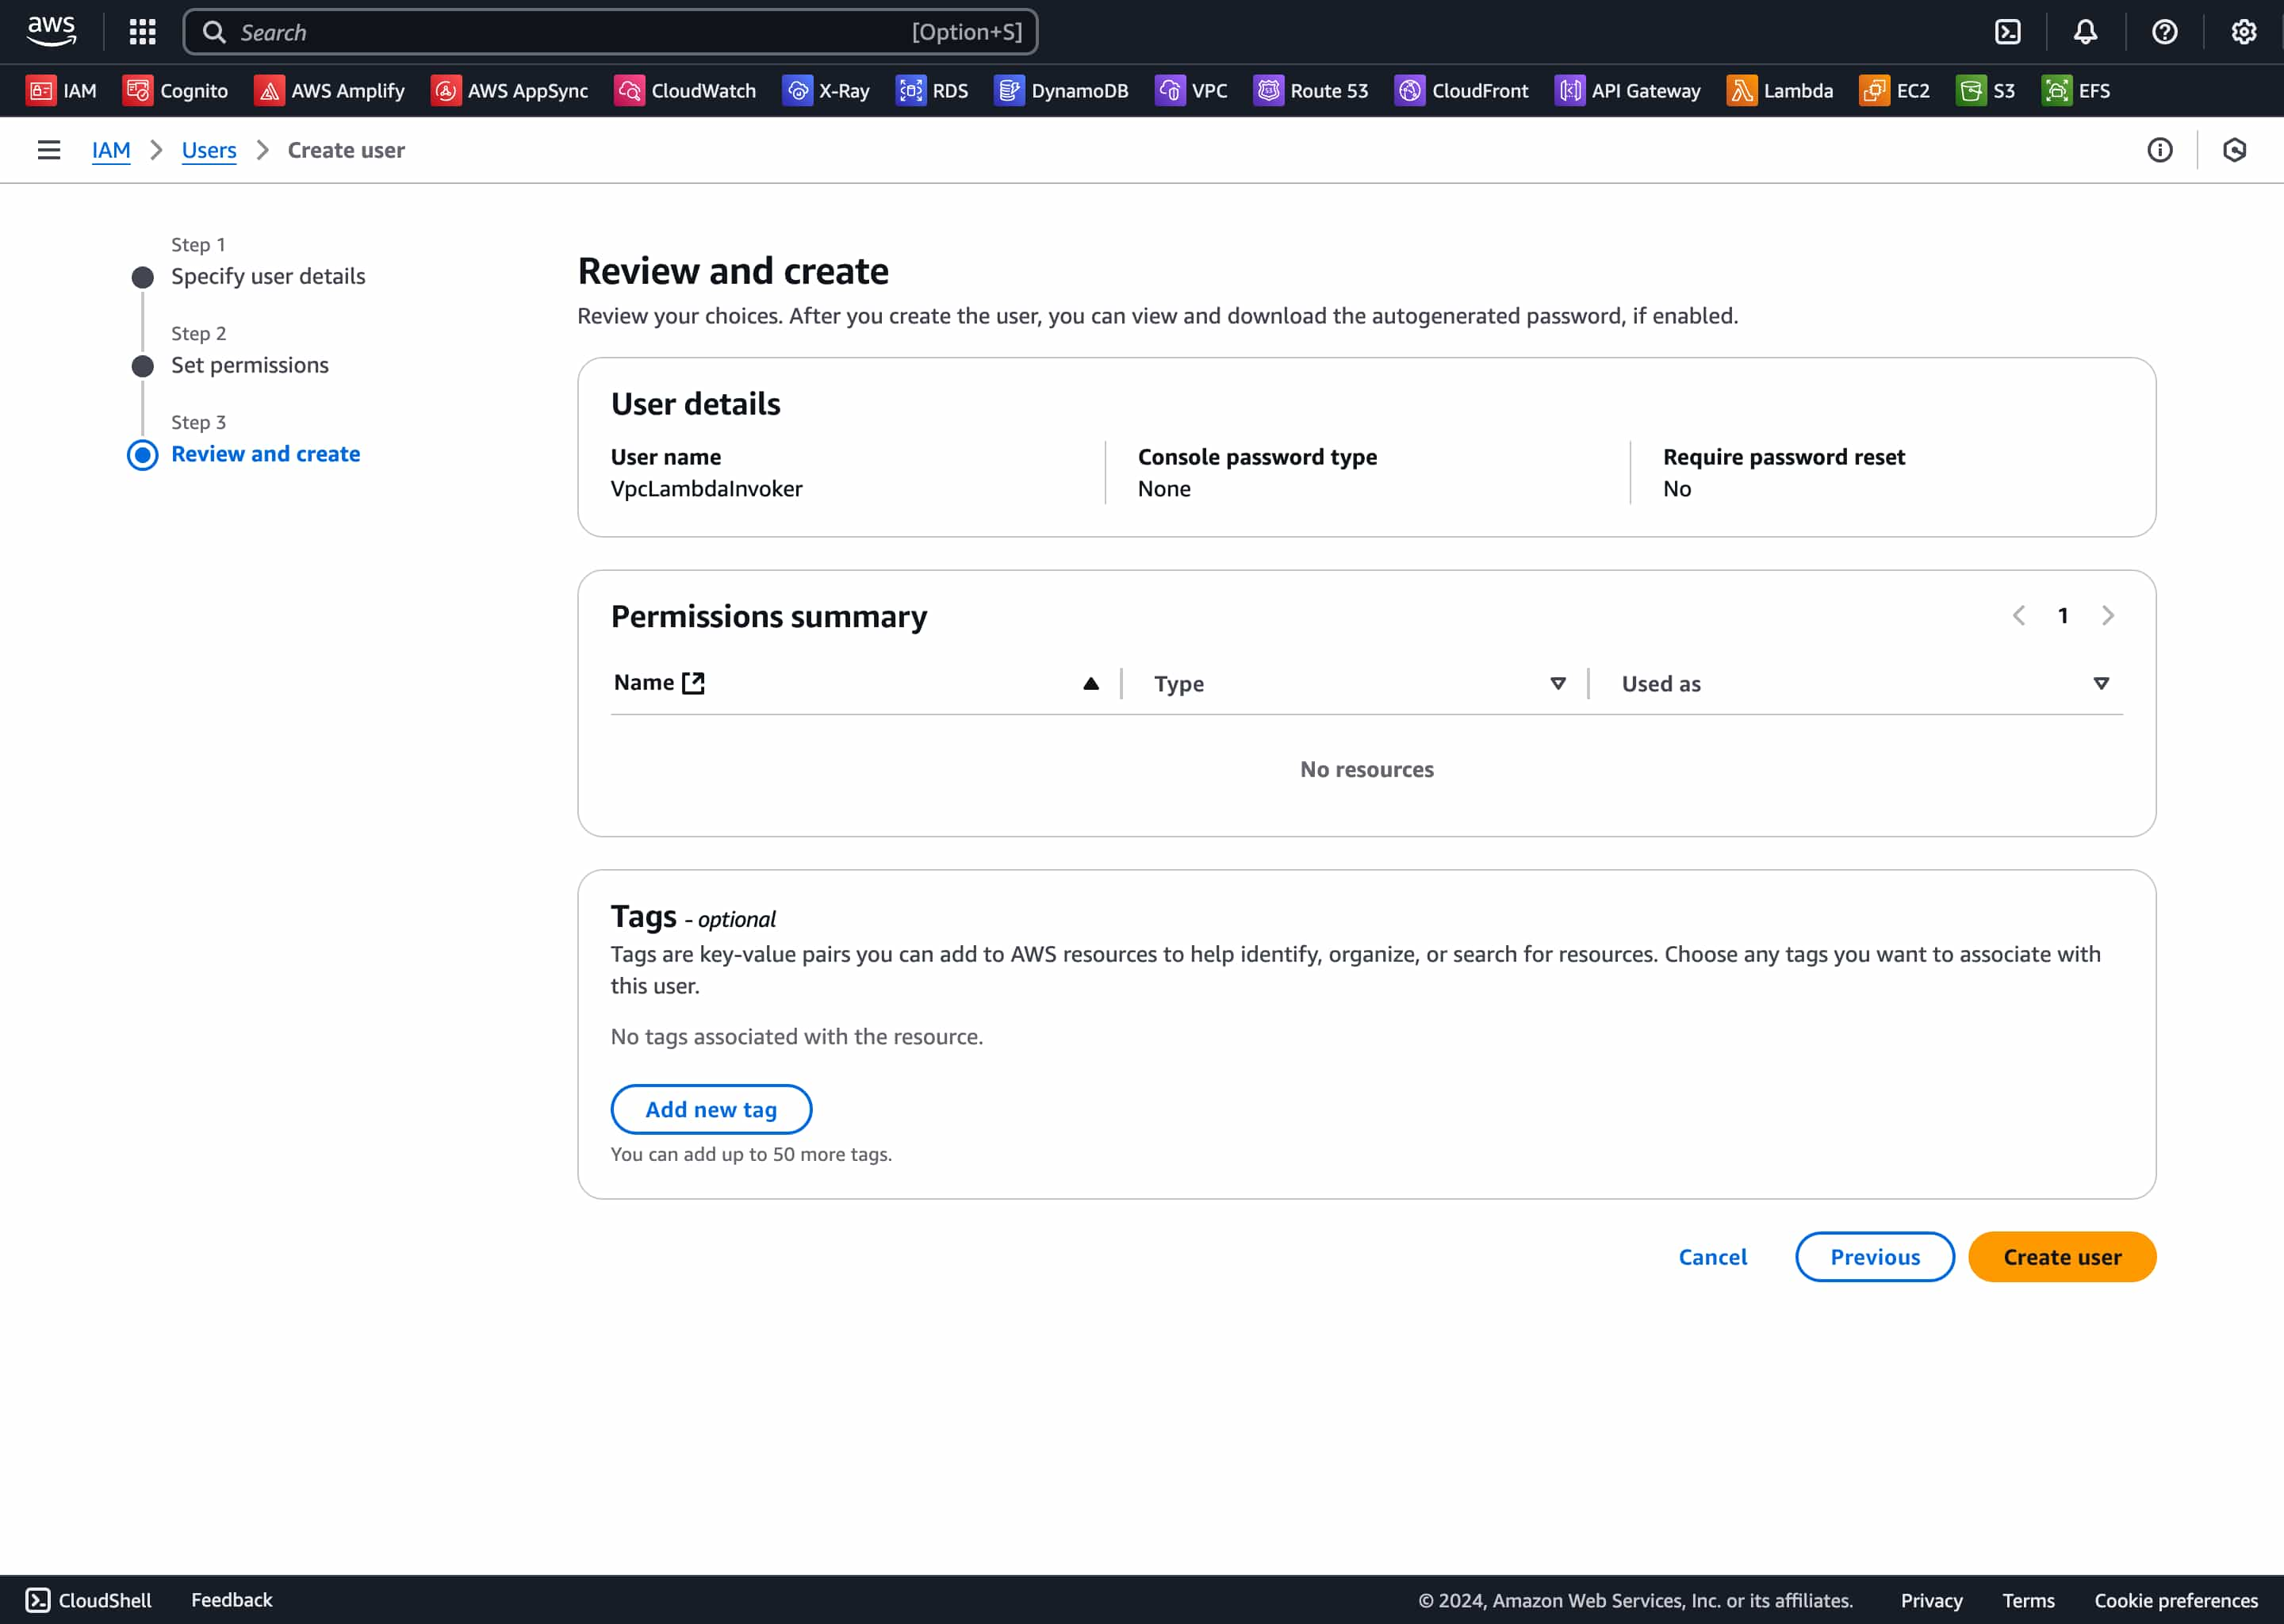
Create an IAM user specifically for invoking the VPC Lambda. This IAM user needs credentials and a policy that allows invoking the VPC Lambda.
- Create IAM User: generate IAM User named
VpcLambdaInvokerand security credentials (Access key ID and Secret access key) in theIAM / Users / VpcLambdaInvoker / Create access key. (USECASE selection and description tags can be anything)
- Policy Setup: Attach a policy to the IAM user that grants permission to invoke the VPC Lambda function in the
IAM / Users / VpcLambdaInvoker / Create policyJSON Editor. The policy should be the prev VPC Lambda's App ARN as the Resource value.
{
  "Version": "2012-10-17",
  "Statement": [
    {
      "Effect": "Allow",
      "Action": "lambda:InvokeFunction",
      "Resource": "<VPC_Lambda_App_ARN>"
    }
  ]
}
3.3. Attach AWS Hosting's Service Role
Update the service role used by AWS Amplify to include permissions for invoking the VPC Lambda:
- Role Selection: In the
IAM / Roles, search for theAmplifySSRLoggingRolenoted earlier section and select the matching AWS Amplify Service role memed previously.

- Policy Configuration: Create a folloing custom policy allowing the necessary SSM operationsto fetch required parametersand attach it to the service role. Enter the Amplify App ID from the end of the previously noted AWS Amplify App ARN into the
AMPLIFY_APP_ID. (maybe id is used in url or something!)
{
    "Version": "2012-10-17",
    "Statement": [
        {
            "Sid": "AllowAmplifySSMCalls",
            "Effect": "Allow",
            "Action": [
                "ssm:GetParametersByPath",
                "ssm:GetParameters",
                "ssm:GetParameter"
            ],
            "Resource": [
                "arn:aws:ssm:*:*:parameter/amplify/<AMPLIFY_APP_ID>/*"
            ]
        }
    ]
}
Once you have named and created InvokeVpcLambdaPolicy, the IAM config is complete! Save the following four environment variables values:
# .env.local
VPC_AWS_ACCESS_KEY_ID=xxxxxxxxxxxxxxxxxxxx
VPC_AWS_SECRET_ACCESS_KEY=xxxxxxxxxxxxxxxxxxxxxxxxxxxxxxxxxxxxxxxx
VPC_LAMBDA_AWS_REGION=ap-northeast-1
VPC_LAMBDA_FUNCTION_NAME=amplify-xxxxxxxxxxxxxx-xx-xxxxxxxxxxxxxxxxxxxxxxxx-xxxxxxxxxxxx
4. Create App
After setting up IAM config, you can now access AWS resources inside the VPC through Waku's Server Component. Here’s how to invoke a function and manage environmental variables for AWS Amplify and Lambda:
4.1. Invoke VPC Lambda in Server Component
You can invoke VPC Lambda functions to display VPC data on your UI. Below is an example function for invoking a Lambda:
import { Lambda } from "@aws-sdk/client-lambda";

const lambda = new Lambda({
  region: process.env.VPC_LAMBDA_AWS_REGION!,
  credentials: {
    accessKeyId: process.env.VPC_AWS_ACCESS_KEY_ID!,
    secretAccessKey: process.env.VPC_AWS_SECRET_ACCESS_KEY!,
  },
});

async function invokeLambda() {
  const args = {
    FunctionName: process.env.VPC_LAMBDA_FUNCTION_NAME!,
    Payload: JSON.stringify({}),
  };

  const res = await lambda.invoke(args);
  const buf = Buffer.from(res.Payload!);
  return JSON.parse(buf.toString());
}

export default async function HomePage() {
  const data = await invokeLambda();
  return <p>{data.body}</p>; // Display Hello Hono!
}
4.2. Manage Environment Variables
Configure the obtained environment variables in the Amplify console under Manage environment variables.

4.3. Deploy
Update the amplify.yml file to pass the environment variables during the CI/CD process into AWS Lambda. With these steps connect to and render content from AWS Resources within a VPC 🎉
version: 1
frontend:
  phases:
    preBuild:
      commands:
        - env | grep -e VPC_AWS_ACCESS_KEY_ID >> .env
        - env | grep -e VPC_AWS_SECRET_ACCESS_KEY >> .env
        - env | grep -e VPC_LAMBDA_AWS_REGION >> .env
        - env | grep -e VPC_LAMBDA_FUNCTION_NAME >> .env
        - npm ci --cache .npm --prefer-offline
        - npx ampx pipeline-deploy --branch $AWS_BRANCH --app-id $AWS_APP_ID
    build:
      commands:
        - npm run build
    postBuild:
      commands:
        - npm prune --production
        - rm -rf ./.amplify-hosting
        - mkdir -p ./.amplify-hosting/compute
        - cp -r ./dist ./.amplify-hosting/compute/default
        - cp -r ./node_modules ./.amplify-hosting/compute/default/node_modules
        - cp -r ./dist/public ./.amplify-hosting/static
        - cp -r ./dist/public ./.amplify-hosting/compute/default
        - cp deploy-manifest.json ./.amplify-hosting/deploy-manifest.json
        - cp startServer.mjs ./.amplify-hosting/compute/default/startServer.mjs
        - 'echo "{ \"type\": \"module\" }" > ./.amplify-hosting/compute/default/package.json'
  artifacts:
    baseDirectory: .amplify-hosting
    files:
      - '**/*'