Hono 🔥 SQLite CMS AWS deploy
https://zenn.dev/jp/articles/947373b85a3dc1
↑ 日本語版
This article provides a step-by-step guide on deploying an easy-to-setup CMS Resource with SQLite on AWS using Hono, integrated with AWS Amplify.
https://github.com/tseijp/next-amplify-with-lambda-test

Start your project with the following commands to easily build a CMS based on this article.
npx create-next-app@latest --yes
cd my-app
npm create amplify@latest --yes
1. Deploying SQLite and Hono Endpoints Handling SQLite on AWS Resources
https://zenn.dev/nixieminton/articles/dc041d5bc8c09f
Refer to this Zenn article to create the necessary AWS resources for a CMS, and explain the steps to build from Amplify. Run SQLite on Amazon Elastic File System and construct Hono endpoints accessible within a VPC via Lambda.
1.1. Creating aws-cdk Code to Define File System and Lambda in VPC
AWS resources are defined using aws-cdk, which is deployed automatically by Amplify's CI/CD. Save the following three resource files in your project:
1.2. Updating backend.ts to Construct Custom Resources Running SQLite and Hono
Modify the code as below to ensure the necessary AWS resources for a CMS are deployed via Amplify's CI/CD. AWS Cognito will also be deployed together to implement the authentication later.
// amplify/backend.ts
import { defineBackend } from "@aws-amplify/backend";
import { auth } from "./auth/resource";
import FileSystem from "./custom/FileSystem/resource";
import VpcLambda from "./custom/VpcLambda/resource";
import VpcSubnet from "./custom/VpcSubnet/resource";

const backend = defineBackend({ auth });

const stack = backend.createStack("CustomResources");

const { vpc } = new VpcSubnet(stack, "VpcSubnet");

const { accessPoint } = new FileSystem(stack, "FileSystem", { vpc });

new VpcLambda(stack, "VpcLambda", { vpc, accessPoint });
1.3. Connecting GitHub Repository to AWS Amplify for Auto-Deployment via CI/CD
Create the handler.ts and save it for now. Once these changes are pushed to GitHub, simply clicking through Amplify's console will auto-deploy:
// handler.ts
import sqlite3 from "sqlite3";

const DB_PATH = "/mnt/db/db.sqlite";

const db = new sqlite3.Database(DB_PATH);

export const handler = () => {
  console.log(`Hello SQLite ${sqlite3.VERSION}`);
};
2. Configuring Access to VPC Resources from Deployed Next.js on AWS Amplify
This chapter explains how to connect Amplify to access resources within the VPC from Next.js. Set up Amplify and IAM policies and environmental variables settings.
2.1. Setup IAM to invoke Lambda in VPC from Next.js
https://zenn.dev/jp/articles/6a5f2d90d0c6c8#3.-accessing-vpc-lambda-via-aws-amplify
Follow the same steps as chapter 3 of the recently published article to configure Amplify and IAM policies using information from the deployed Amplify and Lambda's Arn. Retrieve the four environment variables:
# .env.local
VPC_AWS_ACCESS_KEY_ID=xxxxxxxxxxxxxxxxxxxx
VPC_AWS_SECRET_ACCESS_KEY=xxxxxxxxxxxxxxxxxxxxxxxxxxxxxxxxxxxxxxxx
VPC_LAMBDA_AWS_REGION=ap-northeast-1
VPC_LAMBDA_FUNCTION_NAME=amplify-xxxxxxxxxxxxxx-xx-xxxxxxxxxxxxxxxxxxxxxxxx-xxxxxxxxxxxx
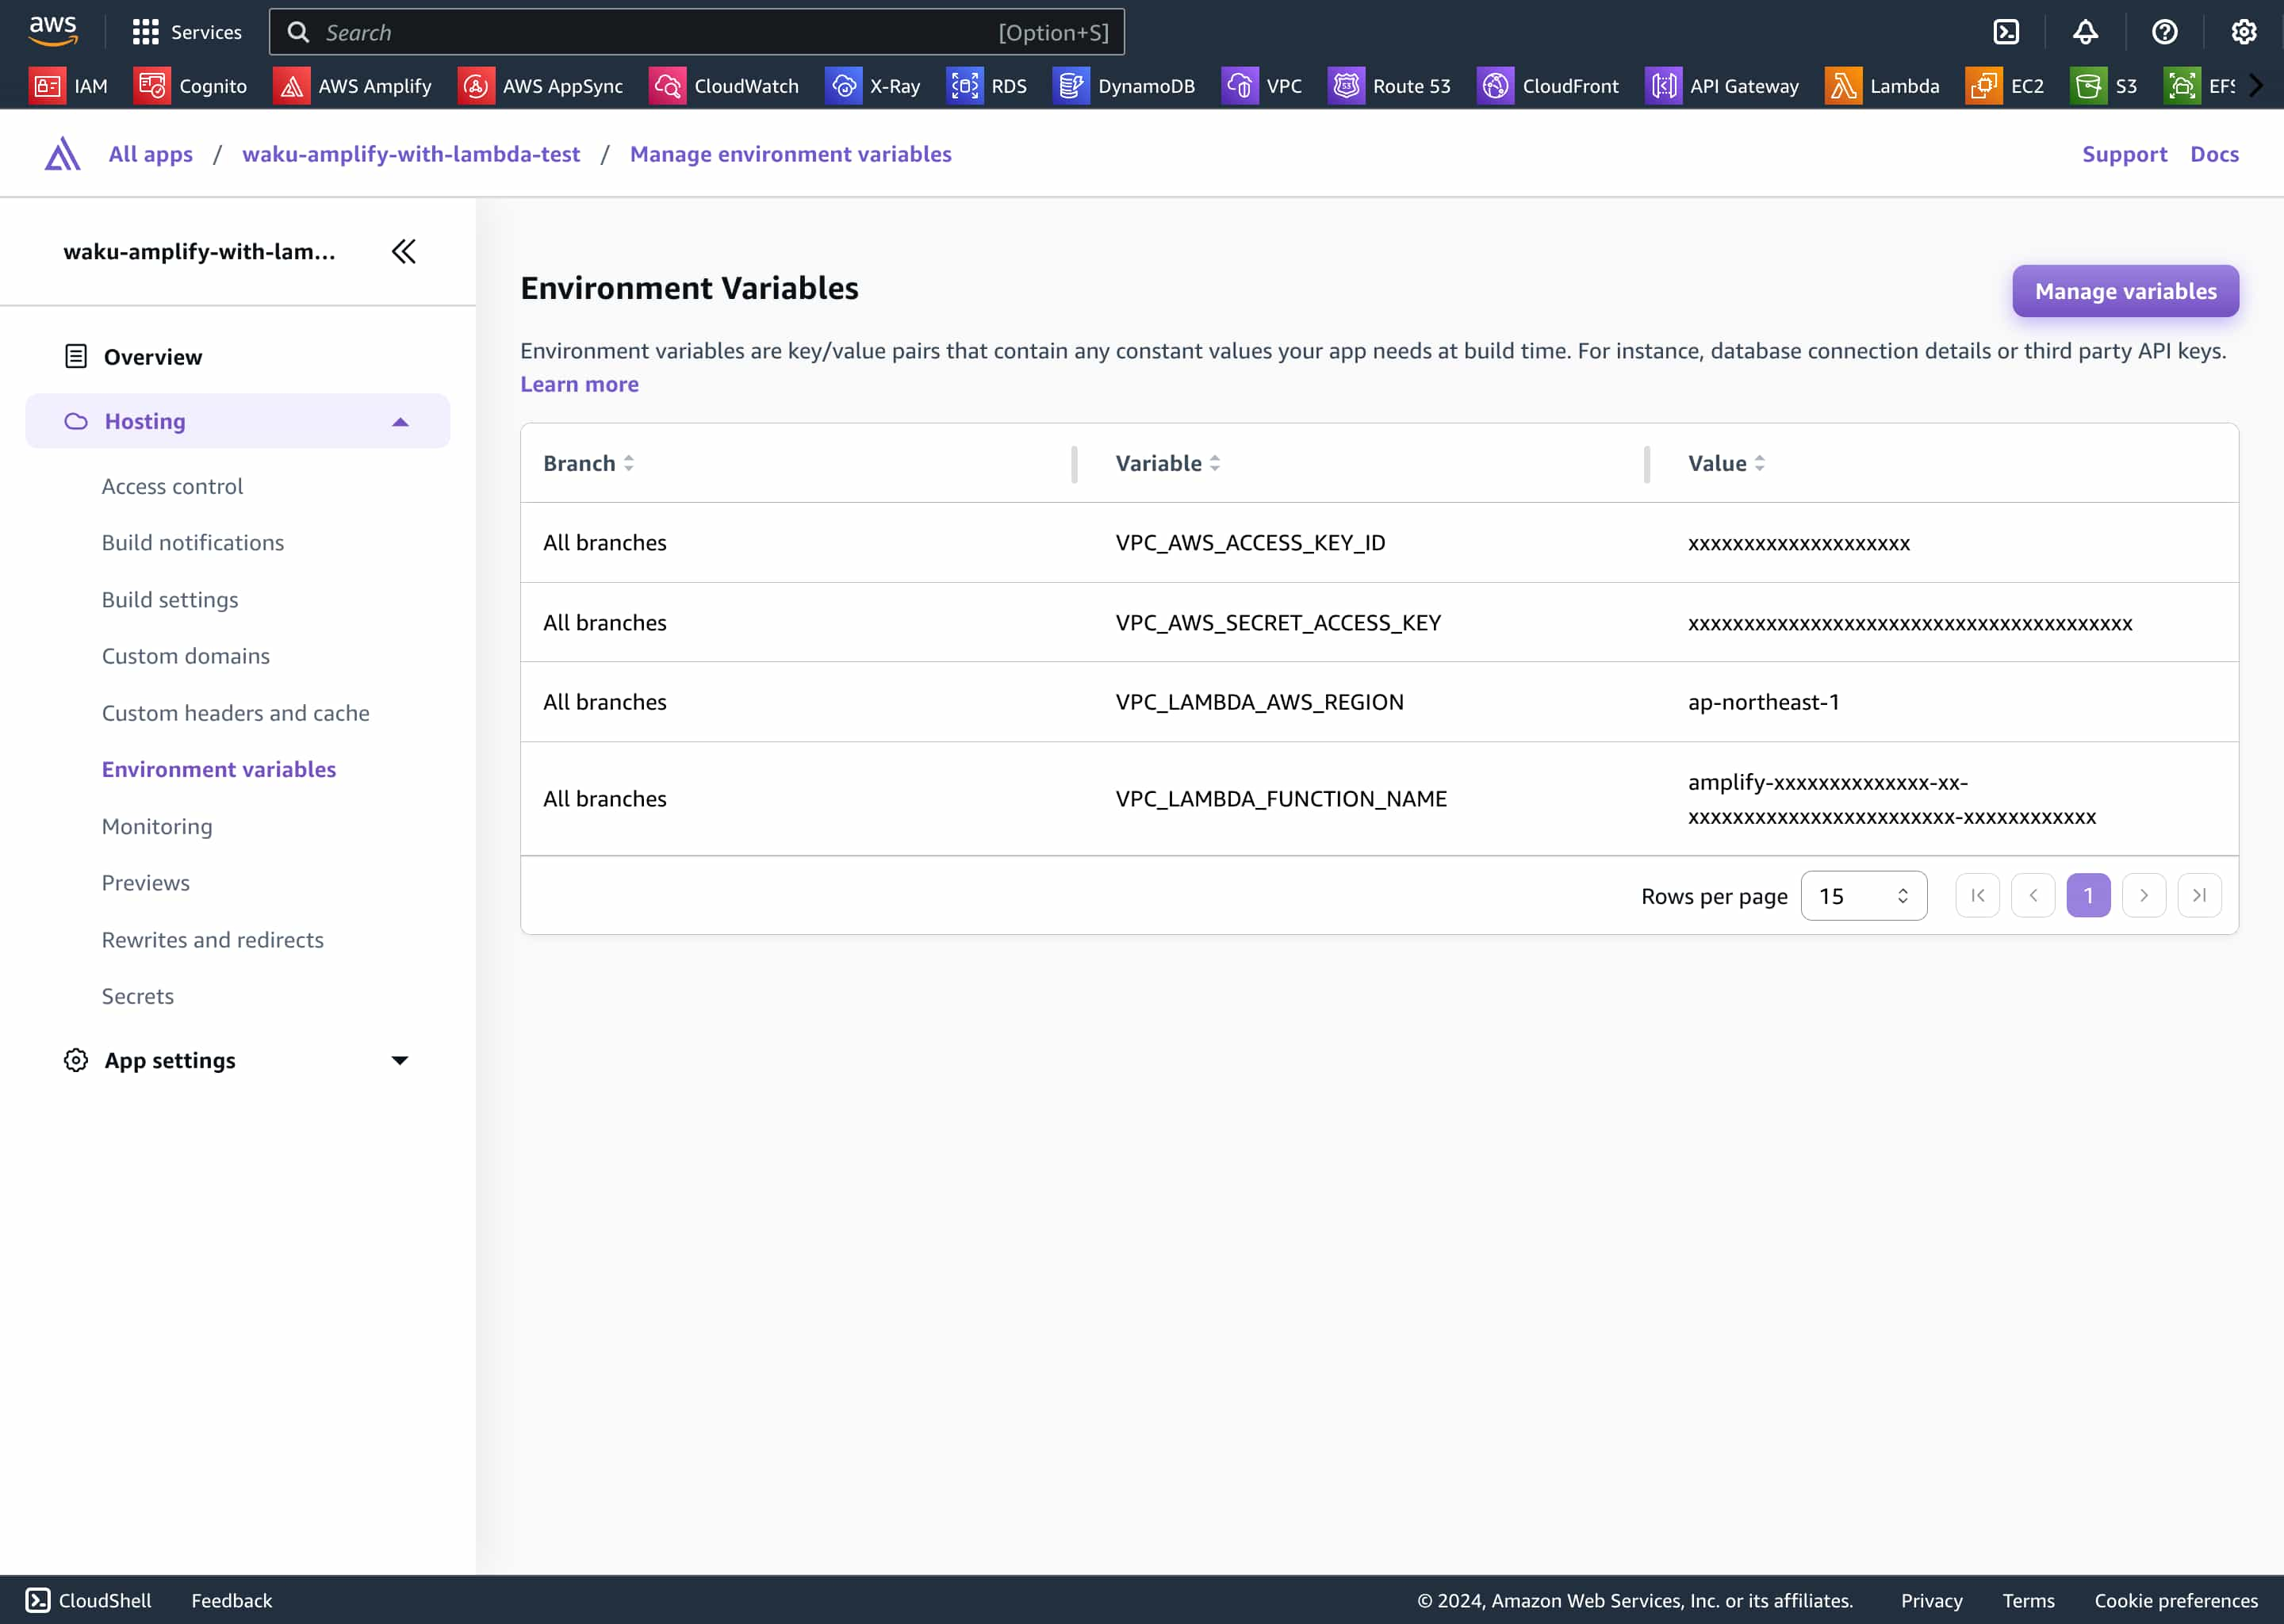
2.2. Setting Environment Variables in AWS Amplify and Deploying
Set the acquired four environment variables on the 'Manage environment variables' page of the Amplify console.
2.3. Creating amplify.yml for Passing Environmental Settings to Lambda
Save the following amplify.yml in the project root, adding commands to pass four environment variables to the server side:
# amplify.yml
version: 1
backend:
  phases:
    build:
      commands:
        - env | grep -e VPC_AWS_ACCESS_KEY_ID >> .env || true
        - env | grep -e VPC_AWS_SECRET_ACCESS_KEY >> .env || true
        - env | grep -e VPC_LAMBDA_AWS_REGION >> .env || true
        - env | grep -e VPC_LAMBDA_FUNCTION_NAME >> .env || true
        - npm ci --cache .npm --prefer-offline
        - npx ampx pipeline-deploy --branch $AWS_BRANCH --app-id $AWS_APP_ID
frontend:
  phases:
    build:
      commands:
        - npm run build
  artifacts:
    baseDirectory: .next
    files:
      - '**/*'
  cache:
    paths:
      - .next/cache/**/*
      - .npm/**/*
3. Implementing a SQLite Handler with Hono in a VPC Lambda
Create Hono endpoints to manage SQLite and deploy to Lambda. Developing the API in TypeScript allows sharing API-side specification as type information during client-side development.
3.1. Implementing the handler.ts Code for SQLite Database Operations
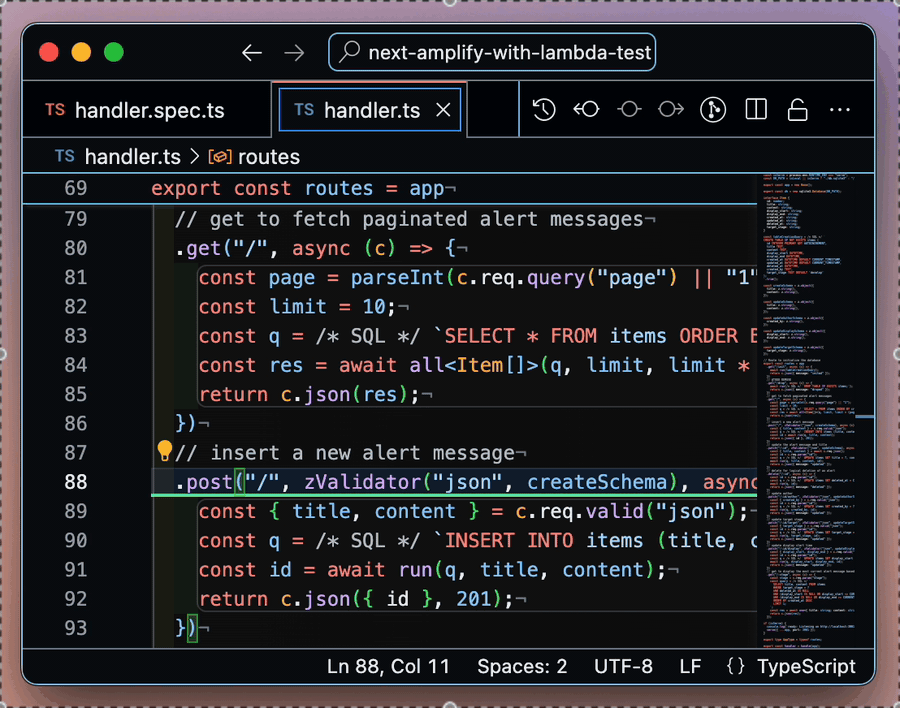
Develop endpoints necessary for database initialization and data operations using Hono.Hono's Client feature allows the use of type hints to be specified during POST using zod for validation:
// handler.ts

// ...

export const app = new Hono();

export const db = new sqlite3.Database(DB_PATH);

export const routes = app
  .get("/init", async (c) => {
    await run(tableCreationQuery);
    return c.json({ message: "inited" });
  })
  .get("/", async (c) => {
    const page = parseInt(c.req.query("page") || "1");
    const q = `SELECT * FROM items ORDER BY created_at DESC LIMIT ? OFFSET ?`;
    const res = await all<Item[]>(q, 10, 10 * (page - 1));
    return c.json(res);
  })
  .post("/", zValidator("json", createSchema), async (c) => {
    const { title, content } = c.req.valid("json");
    const q = `INSERT INTO items (title, content) VALUES (?, ?)`;
    const id = await run(q, title, content);
    return c.json({ id }, 201);
  })

// ...

export type AppType = typeof routes;

export const handler = handle(app);
3.2. Unit Testing the SQLite Handler Locally Before Deployment
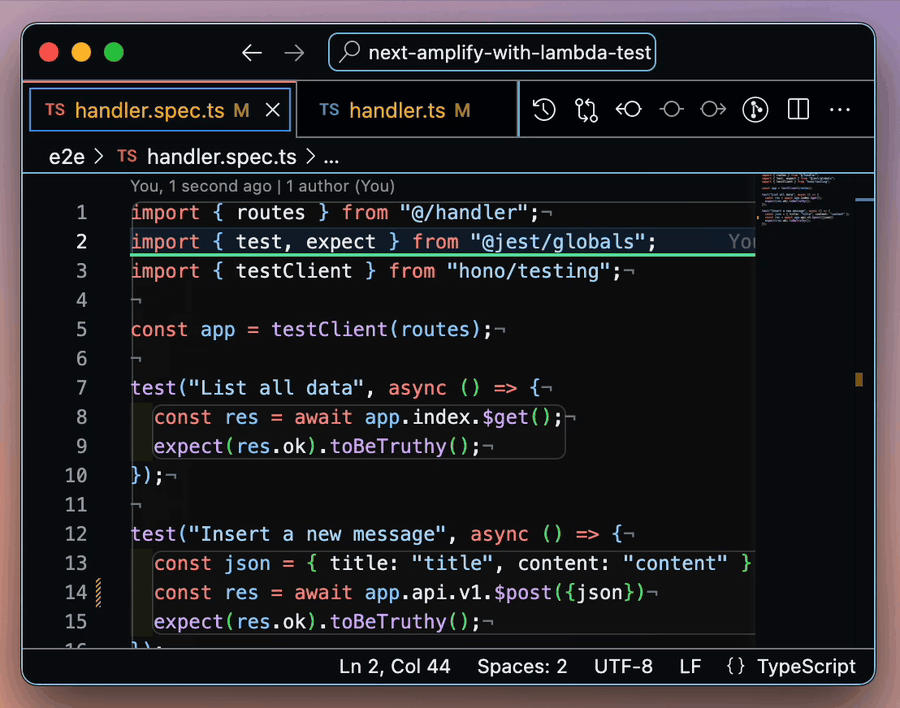
Use Hono's testClient to share TypeScript types between the server and uni test, and editor completion works during testing, detecting type errors when API endpoints change, and completing corrections through the editor:
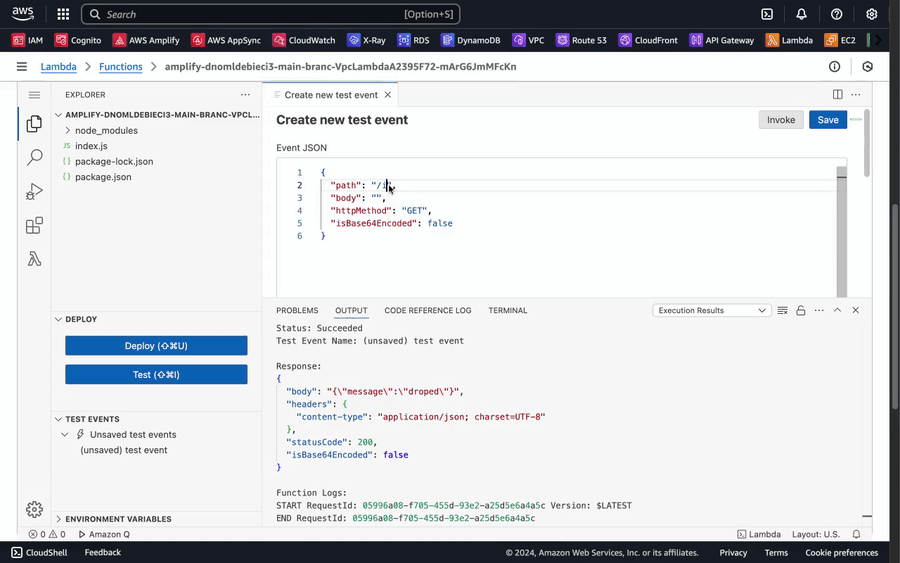
3.3. Deploying and Functionally Testing the SQLite Handler from AWS Console
Push changes to GitHub for deployment. You can then test the Lambda from AWS's console, initiating requests to the /init endpoint and verify other operations:
4. Implementing a Lambda Invoker in Next.js Server Components
Discuss methods for invoking Lambda from the Next.js side to display data within the VPC, sharing development ease using Hono's client functionality and type definitions.
4.1. Implementing the Lambda invoker.ts Code to Access Inside the VPC
Define a function to invoke Lambda using stored environment variables; used with Hono's Client, type information on the API side can again be shared.
// invoker.ts
import { AppType } from "@/handler";
import { Lambda } from "@aws-sdk/client-lambda";
import { hc } from "hono/client";

const lambda = new Lambda({
  region: process.env.VPC_LAMBDA_AWS_REGION!,
  credentials: {
    accessKeyId: process.env.VPC_AWS_ACCESS_KEY_ID!,
    secretAccessKey: process.env.VPC_AWS_SECRET_ACCESS_KEY!,
  },
});

const customFetch = async (path: RequestInfo | URL, init?: RequestInit) => {
  const { body, method, headers } = init ?? {};
  const payload = {
    path,
    body,
    httpMethod: method,
    headers: Object.fromEntries(headers as []),
    isBase64Encoded: false,
  };

  const args = {
    FunctionName: process.env.VPC_LAMBDA_FUNCTION_NAME,
    Payload: JSON.stringify(payload),
  };

  const res = await lambda.invoke(args);
  const buf = Buffer.from(res.Payload!);
  const obj = JSON.parse(buf.toString());
  return new Response(obj.body);
};

export const invoker = () => hc<AppType>("", { fetch: customFetch });
4.2. Writing Integration Tests for Lambda Invoke Using the Same Code as Unit Tests
Switch the testClient in unit tests to invoker, allowing the same code to be used for integration testing.
4.3. Operate Resources Inside the VPC from Next.js Server-Side
Test accessing SQLite data within the VPC from Next.js Server Components. Just do our best to implement the CURD features on the UI, and the CMS is complete!
// app/page.tsx
export default async function Home() {
  const res = await app.index.$get();
  const list = await res.json();
  return JSON.stringify(list);
}